# Lightning Network FAQ
This document clarifies some of the most common questions and issues users face with the Lightning Network in BTCPay. Before you start using the off-chain protocol, familiarize yourself with the risks. Additionally, read Getting Started with Lightning Network in BTCPay
- Lightning Network General FAQ
- How many users can use Lightning Network in BTCPay?
- How to find node info and open a direct channel with a store using BTCPay?
- As a merchant, do I need to open direct channels?
- How can I get inbound capacity to my node?
- I previously installed BTCPayServer without lightning, can I enable it?
- Can I use a pruned node with LN in BTCPay?
- Can I use my existing LN node with BTCPay?
- How to change from Core Lightning (CLN) to LND or vice-versa?
- I switched Lightning Network implementation, but getting "no payment available" error
- I get "WARNING: The LIGHTNING_ALIAS variable is not set. Defaulting to a blank string" when starting container
- How to display my Lightning Node information so that others can connect to me?
- Where can I find recovery seed backup for my Lightning Network wallet in BTCPay Server?
- How to disable on-chain payments and use LN payments only?
- How to see my Lightning Network version?
- How to redirect a Lightning Address?
- Lightning Network LND FAQ
- How to restart my LND?
- How to rescan the LND on-chain wallet?
- How to see LND logs?
- What’s the default directory of LND in BTCPay?
- Which macaroon needs to be provided for external nodes?
- LND connection issues after an update
- How to change my LND Node alias?
- How to edit lnd.conf?
- How to connect to a LND watchtower?
- How to run a LND watchtower?
- How to install ThunderHub?
- Lightning Network Core Lightning (CLN) FAQ
- Lightning Network Questions and Support
# Lightning Network General FAQ
Here are some general questions about LN in BTCPay, regardless of the implementation.
# How many users can use Lightning Network in BTCPay?
On a self-hosted server, you can use only one internal Lightning node. Server owners can use the same Lightning node for an unlimited number of stores tied to their admin account.
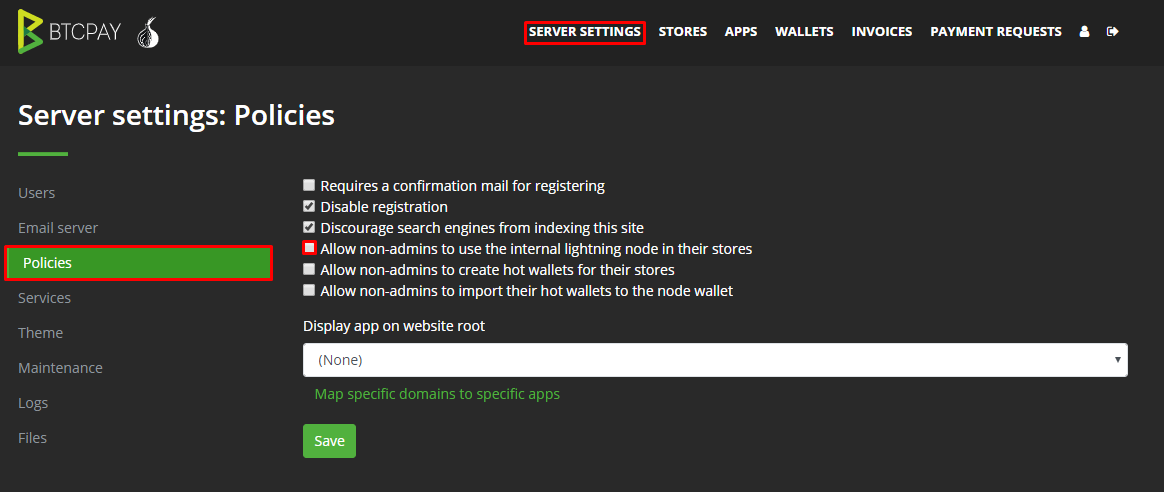
Since version 1.0.3.128, a BTCPay Server host can enable it's registrants to use the internal Lightning Network node. It can be enabled in Server Settings > Policies > Allow non-admins to use the internal lightning node in their stores.
As a third-party host
All your registrants' funds will go to your own Lightning Wallet. You will have to manually check and redispatch the funds to their respective owners. This could potentially become a burden.
As an individual using a third-party host
All payments made through the Lightning Network will go to your third-party's wallet. Take precautions and only use this option while using a trustworthy third-party host to ensure you get your funds back.
Non-admin users can also connect to their own external nodes. Lightning node external connections are a technically advanced task. We recommend that if you want Lightning, you should deploy your own server instead, which comes with all the necessities bundled up.
# How to find node info and open a direct channel with a store using BTCPay?
If you're a customer trying to pay a Lightning Network invoice:
- make sure to select "Lightning" from coin selection.
- Select Copy/Scan
- Select Node Info and scan or copy it manually.
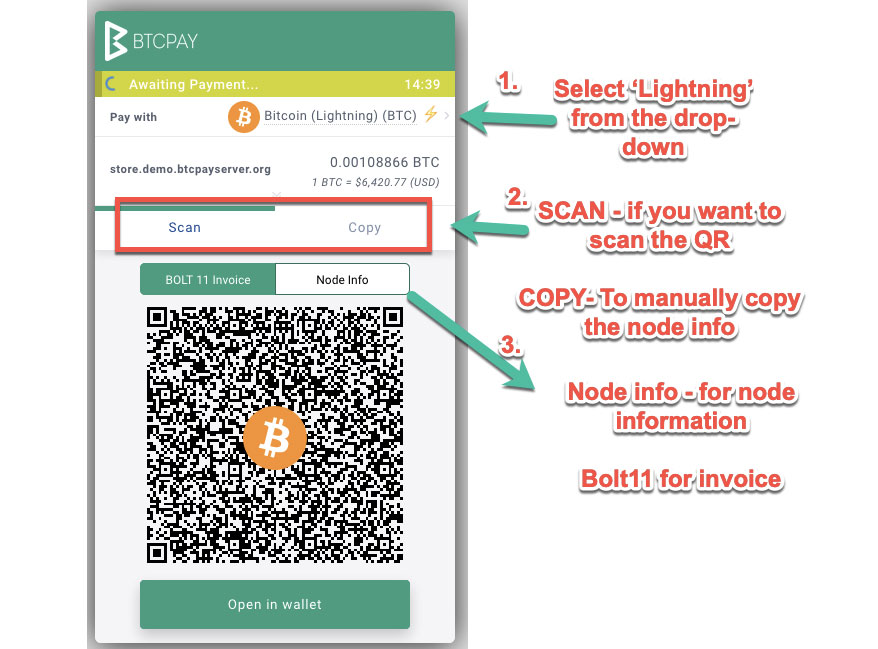
The exact procedure of opening a direct Lightning Network channel depends on the wallet you’re using. But, you should be able to figure it out easily now that you have merchant’s node information.
# As a merchant, do I need to open direct channels?
Merchants need incoming channels. Other people opening a channel with them provides liquidity to the merchant. Your customer should be able to open a direct channel with you.
You can also ask well-connected nodes to open a direct channel with you. Opening a channel is not spending funds, it’s more like putting the funds on a pre-paid card, and spending it later, or withdrawing it by closing a channel.
# How can I get inbound capacity to my node?
There are many ways in which one can get an inbound capacity. We recommend that you read this great article that provides practical tips to inbound capacity (opens new window). When asking for inbound capacity, consider any routing policy fees the service may have.
# I previously installed BTCPayServer without lightning, can I enable it?
BTCPay Server will allow you to set up your Lightning at any moment after creating your first store. We currently support three implementations of the Lightning Network.
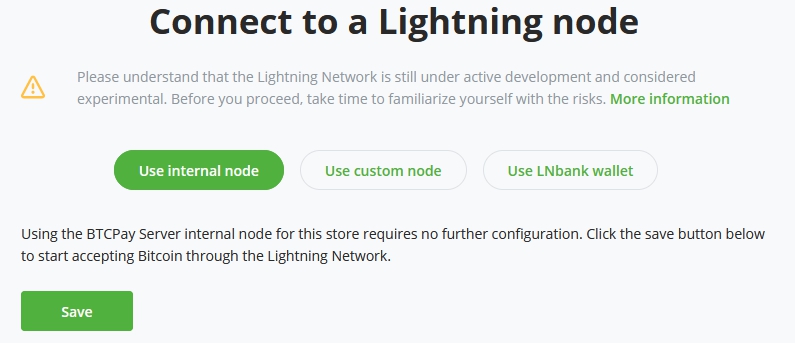
Want to learn more on how to set up your store with Lightning ? Follow along the Lightning Network guide, and you will get your store connected to Lightning Network!
# Can I use a pruned node with LN in BTCPay?
It is recommended to use Core Lightning (CLN) because the implementation supports pruned nodes.
# Can I use my existing LN node with BTCPay?
If you already have a well connected lightning node with sufficient inbound liquidity, you may want to use it with BTCPay instead of the included lightning node.
To do so, go to the lightning node settings page of your store (Store > Settings > Lightning > Modify). Here on the lightning node setting page, select the option for Use a custom lightning node.
The connection strings vary per lightning implementation, the settings page contains the documentation for the connection settings to give you further guidance.
# How to change from Core Lightning (CLN) to LND or vice-versa?
WARNING
Be sure to have closed all channels and removed both on-chain and Lightning funds from the Lightning node before switching from one to the other.
You need to SSH log in into your virtual machine.
To switch to LND:
sudo su -
cd btcpayserver-docker
export BTCPAYGEN_LIGHTNING="lnd"
. ./btcpay-setup.sh -i
To switch to Core Lightning (CLN):
sudo su -
cd btcpayserver-docker
export BTCPAYGEN_LIGHTNING="clightning"
. ./btcpay-setup.sh -i
# I switched Lightning Network implementation, but getting "no payment available" error
When you switch from one implementation to another, you need to reconfigure your lightning connection string at a store level, to use adequate implementation. Stores > Settings > Lightning > Setup > Connection string. In connection string, click on the "click here" link.
# I get "WARNING: The LIGHTNING_ALIAS variable is not set. Defaulting to a blank string" when starting container
You can ignore this. If you want to set an alias for your lightning node, open the env file:
sudo su -
vim $BTCPAY_ENV_FILE
And add or modify the LIGHTNING_ALIAS entry to LIGHTNING_ALIAS=myawesomenode.
# How to display my Lightning Node information so that others can connect to me?
The information other users need to connect to your node, is already displayed at the checkout. Sometimes, merchants want to display their node so that their customers can connect beforehand.
There are numerous ways to find your node information, but the easiest way to display it to others is by using Lightning Node info page. Go to Store > Settings > Lightning > Modify. At the bottom of the page, there is a "Open Public Node Page" button. Click on it to see the information. The page can be embedded into your website with <iframe>.

# Where can I find recovery seed backup for my Lightning Network wallet in BTCPay Server?
Originally BTCPay did use noseedbackup, so you couldn’t backup your LN wallet or get your recovery seed. This was because in Lightning Network there was no solution for backing up funds in channels, just in your on-chain wallet.
By now LND has functionality like static channel backup that depends on seed presence.
But once again, please understand that the Lightning Network is still in an experimental phase and do not put funds into it, which you're not willing to lose (opens new window).
# Using LND with seed (since v1.0.3.138 (opens new window))
You can find the LND Seed Service under:
- Server Settings > Services > LND Seed Backup
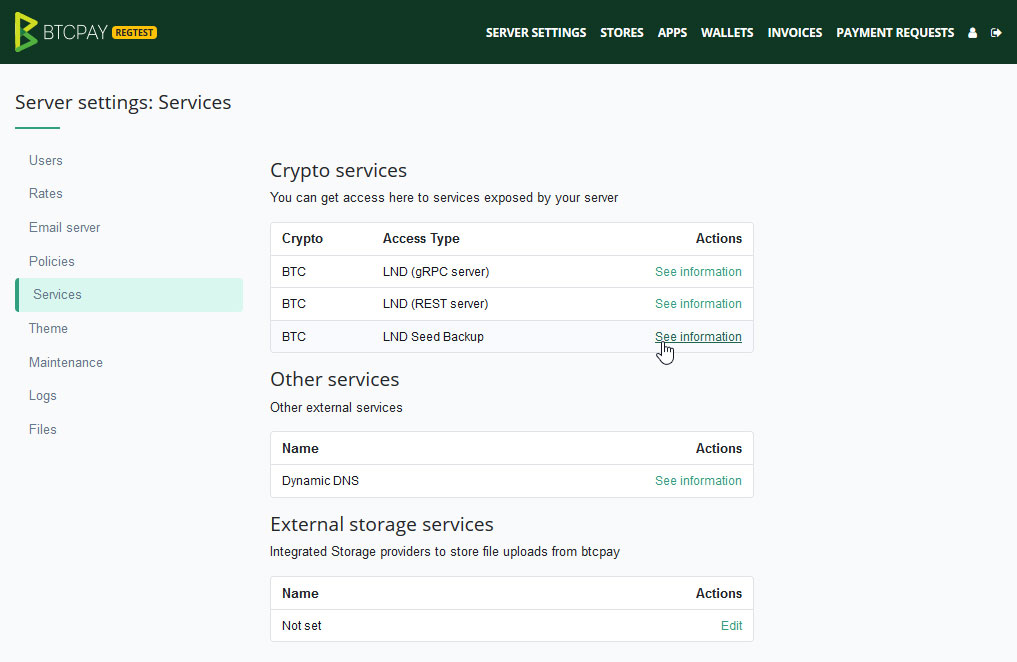
Safely backup and store your recovery seed. The seed is a backup of your on-chain Lightning wallet, but is also necessary to perform static channel backups.
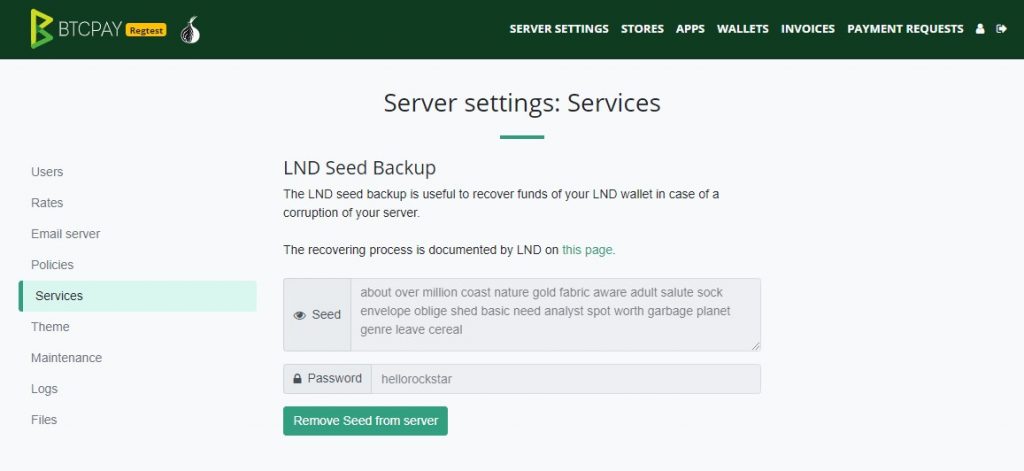
If you backed it up safely you can remove it from the server.
If you migrate from an older version to v1.0.3.138 this blog post on how to do the migration (opens new window) might be helpful.
# How to disable on-chain payments and use LN payments only?
There are two easy ways to do this:
- Store > Settings > Checkout experience > Choose default payment method at checkout
- Store > Settings > Modify > Uncheck the Enabled box to disable on-chain payments
# How to see my Lightning Network version?
You can check your Lightning Network version from the command line. For LND
sudo su -
cd btcpayserver-docker
./bitcoin-lncli.sh help
For Core Lightning (CLN)
sudo su -
./bitcoin-lightning-cli.sh getinfo
Most of the wallets (RTL, Zap, Zeus, etc.) that are able to your lightning node remotely will display the version on the front-end as well.
# How to redirect a Lightning Address?
Use case: Your run a BTCPay server at pay.example.com, but want to use me@example.com as your Lightning Address, because it looks nicer than me@pay.example.com.
All you need to do is set up a 301 redirect from example.com/.well-known/lnurlp/me to pay.example.com/.well-known/lnurlp/me.
You can do so in your webserver configuration, here is an example for nginx:
server {
  server_name example.com;

  # Redirect Lightning Address requests to BTCPay Server
  rewrite ^/\.well-known/lnurlp/(.*)$ https://pay.example.com/.well-known/lnurlp/$1 permanent;
}
# Lightning Network LND FAQ
Here are some of the common questions about the LND implementation (opens new window) of the Lightning Network.
# How to restart my LND?
sudo su -
docker restart btcpayserver_lnd_bitcoin
# How to rescan the LND on-chain wallet?
WARNING
only enable this fragment temporarily to reset the on-chain wallet transactions of lnd and to trigger a rescan after a successful rescan, you should disable this fragment again, or it will rescan the on-chain wallet at every restart! WARNING: The rescan can only pick up the transactions within your archived blocks (beware of PRUNED nodes!)
To customize LND settings which are not available as environment variables, you can create a custom fragment in docker-compose-generator/docker-fragments/opt-lnd-wallet-rescan.custom.yml like this:
version: "3"
services:
  lnd_bitcoin:
    environment:
      LND_EXTRA_ARGS: |
        reset-wallet-transactions=1
  lnd_litecoin:
    environment:
      LND_EXTRA_ARGS: |
        reset-wallet-transactions=1
  lnd_bitcoingold:
    environment:
      LND_EXTRA_ARGS: |
        reset-wallet-transactions=1
For more information on this LND feature, see their documentation (opens new window).
# How to see LND logs?
To check the logs of your LND node in BTCPay Server (Docker installations) use the following command:
docker logs --tail 40 btcpayserver_lnd_bitcoin
You can change 40 to whatever number you wish. The number represents the lines of code that will be shown. For more information about the logs, see Troubleshooting page
# What’s the default directory of LND in BTCPay?
/var/lib/docker/volumes/generated_lnd_bitcoin_datadir/_data
# Which macaroon needs to be provided for external nodes?
BTCPay Server needs the admin.macaroon to check whether the lightning node is fully synced before creating an invoice.
If you want to tailor a macaroon specific to the BTCPay Server connection, use the LND macaroon bakery:
lncli bakemacaroon address:read address:write info:read invoices:read invoices:write onchain:read
# LND connection issues after an update
Authentication tends to fail on LND after an update, symptoms are:
- In store settings, when testing the connection to your node you get
Error while connecting to the API (The HTTP status code of the response was not expected (500).) - In Zap wallet,
Unable to connect to host: cannot retrieve macaroon: cannot get macaroon: root key with id 0 doesn’t exist
In such case, you need to delete the macaroon of lnd and restart it.
If you are using docker deployment, please connect with SSH to your VM and the following command:
sudo su -
docker exec btcpayserver_lnd_bitcoin rm /data/admin.macaroon
docker exec btcpayserver_lnd_bitcoin rm /data/invoice.macaroon
docker exec btcpayserver_lnd_bitcoin rm /data/readonly.macaroon
docker exec btcpayserver_lnd_bitcoin rm /data/data/macaroons.db
docker exec btcpayserver_lnd_bitcoin rm /data/data/chain/bitcoin/mainnet/invoice.macaroon
docker exec btcpayserver_lnd_bitcoin rm /data/data/chain/bitcoin/mainnet/macaroons.db
docker exec btcpayserver_lnd_bitcoin rm /data/data/chain/bitcoin/mainnet/readonly.macaroon
docker restart btcpayserver_lnd_bitcoin
If a macaroon does not exist, you will see an error message, you can safely ignore it.
Because this will invalidate the previous macaroons, you need to manually reconnect with Zap with Server Settings / Services / LND-gRPC.
# How to change my LND Node alias?
To change the display name of your LND node, you should ssh log in into your virtual machine and apply the following:
sudo su -
cd btcpayserver-docker
export LIGHTNING_ALIAS="namehere"
. ./btcpay-setup.sh -i
# How to edit lnd.conf?
To customize LND settings (opens new window) which are not available as environment variables, you can create a custom fragment in docker-compose-generator/docker-fragments/opt-lnd-config.custom.yml like this:
version: '3'
services:
  lnd_bitcoin:
    environment:
      LND_EXTRA_ARGS: |
        minchansize=1234567
You can add your customizations in the LND_EXTRA_ARGS value, like shown by setting the minchansize value.
Afterwards the configuration has to be added to the additional fragments and setup needs to be run:
export BTCPAYGEN_ADDITIONAL_FRAGMENTS="$BTCPAYGEN_ADDITIONAL_FRAGMENTS;opt-lnd-config.custom"
. ./btcpay-setup.sh -i
This way your custom settings gets added to the config and they will persist updates.
# How to connect to a LND watchtower?
To connect a LND watchtower you need to integrate the opt-lnd-wtclient (opens new window) fragment and optionally configure the LND_WTCLIENT_SWEEP_FEE:
export BTCPAYGEN_ADDITIONAL_FRAGMENTS="$BTCPAYGEN_ADDITIONAL_FRAGMENTS;opt-lnd-wtclient"
export LND_WTCLIENT_SWEEP_FEE=10 # Fee to be used for sweep transaction, 10 sat/vbyte is the default
. ./btcpay-setup.sh -i
Afterwards you can use the wtclient RPC commands for managing the connections to watchtowers:
# Connect to a remote watchtower
./bitcoin-lncli.sh wtclient add PUBKEY@IP:PORT

# See your watchtower connections
./bitcoin-lncli.sh wtclient towers
# How to run a LND watchtower?
You can run a watchtower alongside your LND instance by integrating the opt-lnd-watchtower (opens new window) fragment:
export BTCPAYGEN_ADDITIONAL_FRAGMENTS="$BTCPAYGEN_ADDITIONAL_FRAGMENTS;opt-lnd-watchtower"
. ./btcpay-setup.sh -i
This will make the watchtower available on the server.
To allow connections from other watchtower clients (via the wtclient RPC commands), you will need to add the watchtower.externalip to a custom fragment in docker-compose-generator/docker-fragments/opt-lnd-config.custom.yml like this:
version: '3'
services:
  lnd_bitcoin:
    environment:
      LND_EXTRA_ARGS: |
        watchtower.externalip=YOUR_SERVER_IP
Afterwards the configuration has to be added to the additional fragments and open the port 9911 in the firewall settings:
# Add the custom LND fragment
export BTCPAYGEN_ADDITIONAL_FRAGMENTS="$BTCPAYGEN_ADDITIONAL_FRAGMENTS;opt-lnd-config.custom"
. ./btcpay-setup.sh -i

# Open port the watchtower RPC port in the firewall
ufw allow 9911/tcp
Running the tower info command should then list your public watchtower instance in the uris section.
# ./bitcoin-lncli.sh tower info
{
    "pubkey": "YOUR_TOWER_PUBKEY",
    "listeners": [
        "172.23.0.9:9911",
        "127.0.0.1:9911"
    ],
    "uris": [
        "YOUR_TOWER_PUBKEY@YOUR_SERVER_IP:9911"
    ]
}
Learn more about configuring watchtowers (opens new window).
# How to install ThunderHub?
To install ThunderHub on your instance apply the following:
export BTCPAYGEN_ADDITIONAL_FRAGMENTS="$BTCPAYGEN_ADDITIONAL_FRAGMENTS;opt-add-thunderhub"
. btcpay-setup.sh -i
If you get the following warning message Unable to connect to this node it is probably because the certificate used to communicate with LND doesn't have the correct domains. LND doesn't generate new ones unless the previous ones are deleted first.
To delete the old certificate and key and have LND generate new ones, apply the following:
docker exec btcpayserver_lnd_bitcoin rm /data/tls.cert
docker exec btcpayserver_lnd_bitcoin rm /data/tls.key
docker restart btcpayserver_lnd_bitcoin
docker restart generated_bitcoin_thub_1
# Lightning Network Core Lightning (CLN) FAQ
Here are some of the common questions about the Core Lightning (CLN) (opens new window) implementation of the Lightning Network.
# How to restart my Core Lightning (CLN)?
sudo su -
docker restart btcpayserver_clightning_bitcoin
# How to announce an IPv6 address?
First, copy bitcoin-clightning.yml into the the docker fragment folder as bitcoin-clightning.custom.yml.
Important: the file must end with .custom.yml, or there will be git conflicts whenever you run btcpay-update.sh.
Modify the new bitcoin-clightning.custom.yml as the following:
services:
  clightning_bitcoin:
    environment:
      LIGHTNINGD_OPT: |
        announce-addr=[ipv6 here]
Make sure to insert the address between the two square brackets [].
Then set it up:
export BTCPAYGEN_ADDITIONAL_FRAGMENTS="bitcoin-clightning.custom"
. ./btcpay-setup.sh -i
# How to edit .lightning/config?
To customize the Core Lightning settings (opens new window) which are not available as environment variables, you can create a custom fragment in docker-compose-generator/docker-fragments/opt-lightningd-config.custom.yml like this:
version: '3'
services:
  clightning_bitcoin:
    environment:
      LIGHTNINGD_OPT: |
        alias=MyNodeName
        rgb=003366
You can add your customizations in the LIGHTNINGD_OPT value, like shown by setting the alias and rgb values.
Afterwards the configuration has to be added to the additional fragments and setup needs to be run:
export BTCPAYGEN_ADDITIONAL_FRAGMENTS="$BTCPAYGEN_ADDITIONAL_FRAGMENTS;opt-lightningd-config.custom"
. ./btcpay-setup.sh -i
This way your custom settings gets added to the config and they will persist updates.
# Lightning Network Questions and Support
Community support for Lightning Network questions is pretty limited, since the protocol is fairly new.
If you're facing a technical problem with your Lightning Network implementation, that's not documented here you may want to ask questions in their respective communities.
# LND Support
# Core Lightning (CLN) Support
← Apps FAQ Altcoins FAQ →
