# Apps FAQ
This document covers frequently asked questions about the BTCPay Server Apps.
- What are the Apps in BTCPay?
- Is there a limit on the number of Apps I can create?
- Is there a Point of Sale feature in BTCPay?
- How can I use BTCPay in a physical store?
- How to customize the appearance of Point of Sale App in BTCPay
- What is a Payment Button?
- How to create a Pay Button with a custom amount?
- How to map a domain name to an app?
- How to redirect to another site after payment?
- How to integrate WooCommerce Store into a BTCPay Crowdfund app?
# What are the Apps in BTCPay?
Apps are features you can use to expand the use case of your BTCPay. See the apps doc for more information.
# Is there a limit on the number of Apps I can create?
Apps are added on the store level. To create one, you need to have a store already setup. There is no limit to the number of apps that can be assigned to a store.
# Is there a Point of Sale feature in BTCPay?
Yes. Please read our guide on creating the POS app.
# How can I use BTCPay in a physical store?
You can use our Point of Sale (PoS) app. When you create a PoS app within BTCPay Server, it will be publicly accessible via a URL where checkout buttons for products you’ve created for your PoS will be displayed. To have a physical PoS, the easiest solution (currently) is to create a PoS App in BTCPay and display it on any web device such as a phone, tablet or pc.
Please follow our detailed guide on how to use our PoS App on a mobile device (opens new window). Also note that Section 2.3 Connecting a Wallet is covered much more in-depth here in the wallet section.
# How to customize the appearance of Point of Sale App in BTCPay
It is very easy to customize the look of the Point of Sale app. Follow this guide to learn how to change the theme.
# What is a Payment Button?
The Payment Button is a simple and customizable HTML button you can create and embed into your website. To create a payment button, follow this guide.
# How to create a Pay Button with a custom amount?
The BTCPay Server Pay Button which can be found in Store Settings > Pay Button, currently does not support custom amounts. However, you can use a work-around:
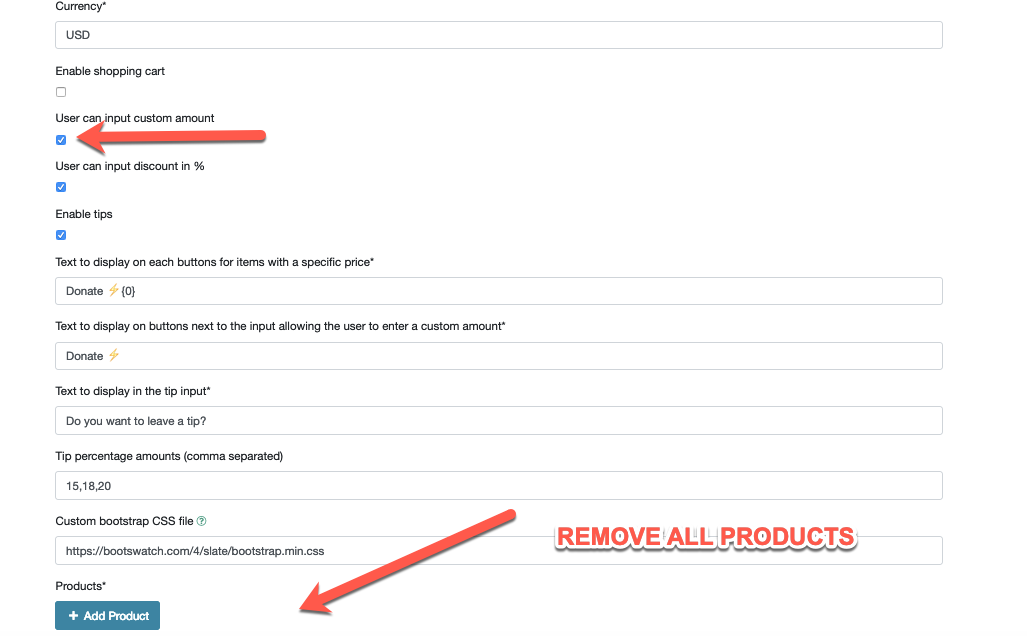
- Create Point of sale app
- Enable
user can input a custom amountfield - Remove all the products from the automatically generated template.
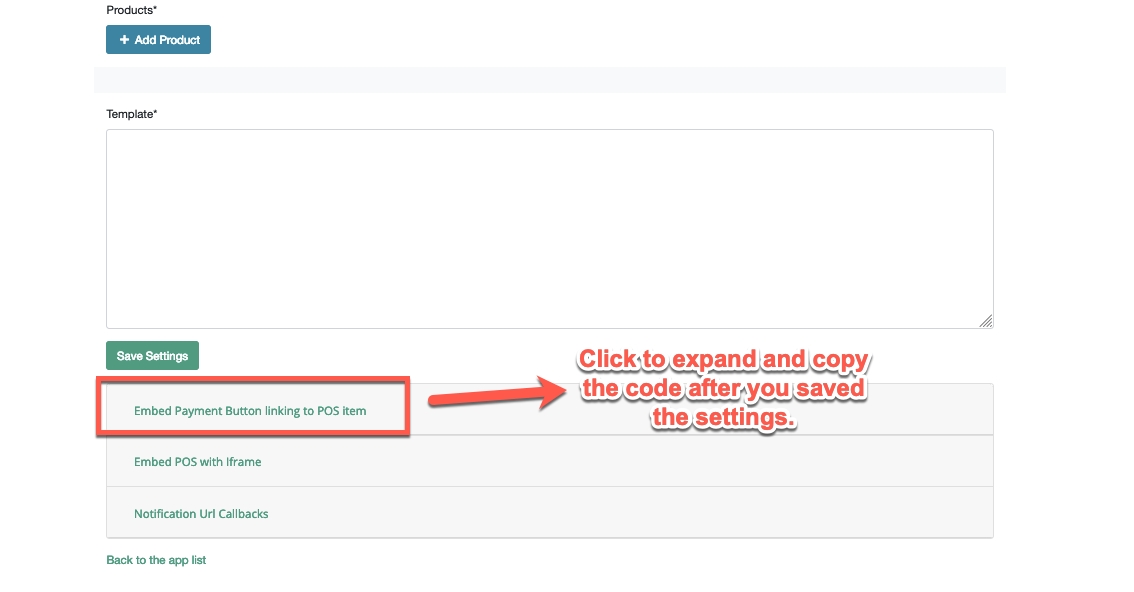
- Save settings.
- Click on the
Embed payment button linking to PoS itemat the bottom of the page and copy the expanded code. Paste it into html page of your website. - Remove the extra fields you do not need, especially
<input name="price" type="hidden" value="10" />so that button redirects to the point of sale.
# How to map a domain name to an app?
BTCPay Server Apps can have a domain name that's different from the servers domain. Let's assume you have BTCPay Server at mybtcpayserver.com and want to display your PoS app on mybtcpaypos.com instead mybtcpayserver.com/apps/pos/abc123 First, configure DNS settings) of mypointofsale.com and make sure it's pointing to the external ip of your BTCPay Server.
Next, add additional domain or subdomain name(s) by adding a new environment variable through ssh:
sudo su -
export BTCPAY_ADDITIONAL_HOSTS="mybtcpaypos.com"
. btcpay-setup.sh -i
If you want to add multiple domains, you just need to update the env variables again:
sudo su -
export BTCPAY_ADDITIONAL_HOSTS="mybtcpaypos.com,subdomain.domain2.com,domain3.com"
. btcpay-setup.sh -i
Finally, in Server Settings > Policies click on the Map specific domains to specific apps
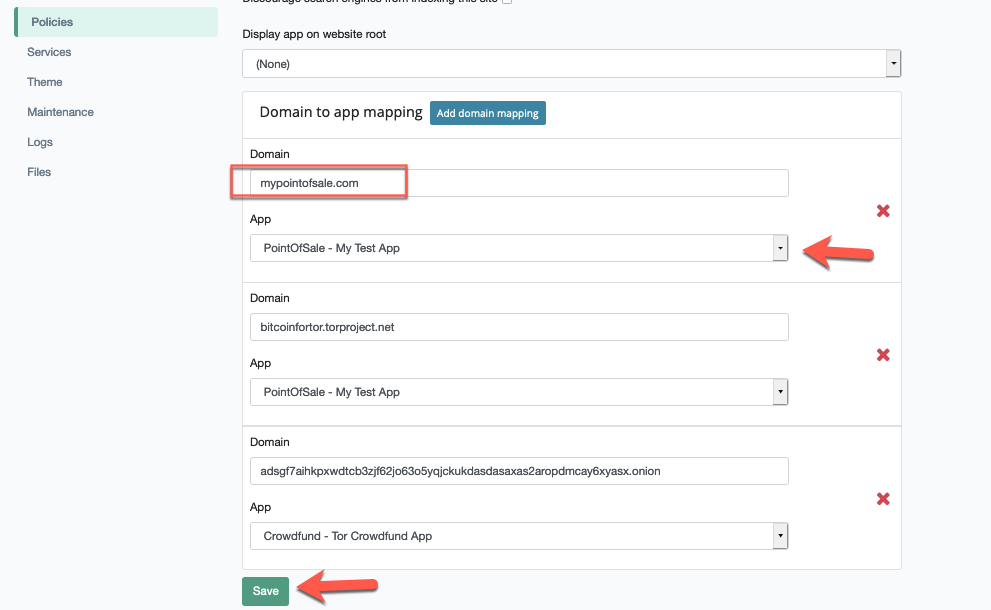
Enter domain name, select a previously created app from the drop down menu and click save to map the app to specific domain.
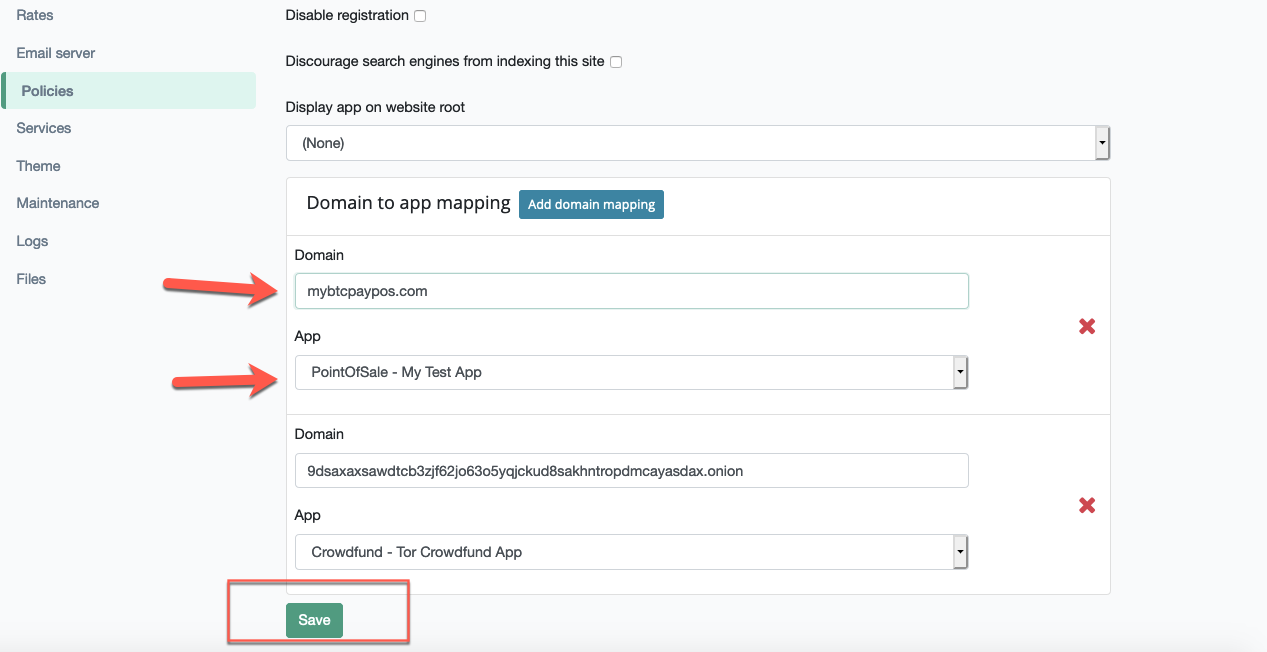
If any of the additionally added hosts do not have a properly configured DNS, Let's Encrypt will not be able to renew the certificate for any of the domains, including the main domain. If you're using additional hosts and facing https issues with the main domain, try removing a domain from the BTCPAY_ADDITIONAL_HOSTS and re-run the setup. The https issue also occurs if Dynamic DNS has not been renewed and is configured as an additional host.
If for any reason, you want an app to be on the same domain as your BTCPay Server homepage, you can select to display it on the root. In that case, no DNS configuration is needed, since your domain is already pointing properly. Using an app on the root domain of BTCPay Server means you'll have to access the login and other pages manually. The easiest way is to append a page route such as /apps or /stores to your root domain. (Ex: mybtcpayserver.com/apps). This will make navigation to your root displayed app easier, but navigation to other pages (such as Login) more challenging for users.
# How to redirect to another site after payment?
Point of Sale apps allow redirecting customers to any URL after an invoice is paid. Modify the redirect functionality in Apps > Settings

In PoS settings these are the following options for redirects on paid invoices:
- No - Without Redirect URL
- Invoice displays a prompt for the user to return to the PoS App (Default setting).
- No - With Redirect URL
- Invoice displays a prompt for the user to return to the provided App Redirect URL.
- Yes - Without Redirect URL
- Paid invoice automatically redirects to the PoS App.
- Yes - With Redirect URL
- Paid invoice automatically redirects to the provided App Redirect URL.
- Use Store Settings
- Enable/disable automatic redirect to the PoS App on the store level.
Notes:
- Provide the Redirect URL in the App Settings (above the redirect option).
- Expired or partially paid invoices will not redirect, even if the setting is enabled. This feature is for paid invoices only.
- Alternatively, redirect URLs can be specified via the API (i.e. Embedded PoS).
# How to integrate WooCommerce Store into a BTCPay Crowdfund app?
If you want to provide a way for your backers to receive digital files and physical products, you can embed WooCommerce store into your Crowdfunding app.
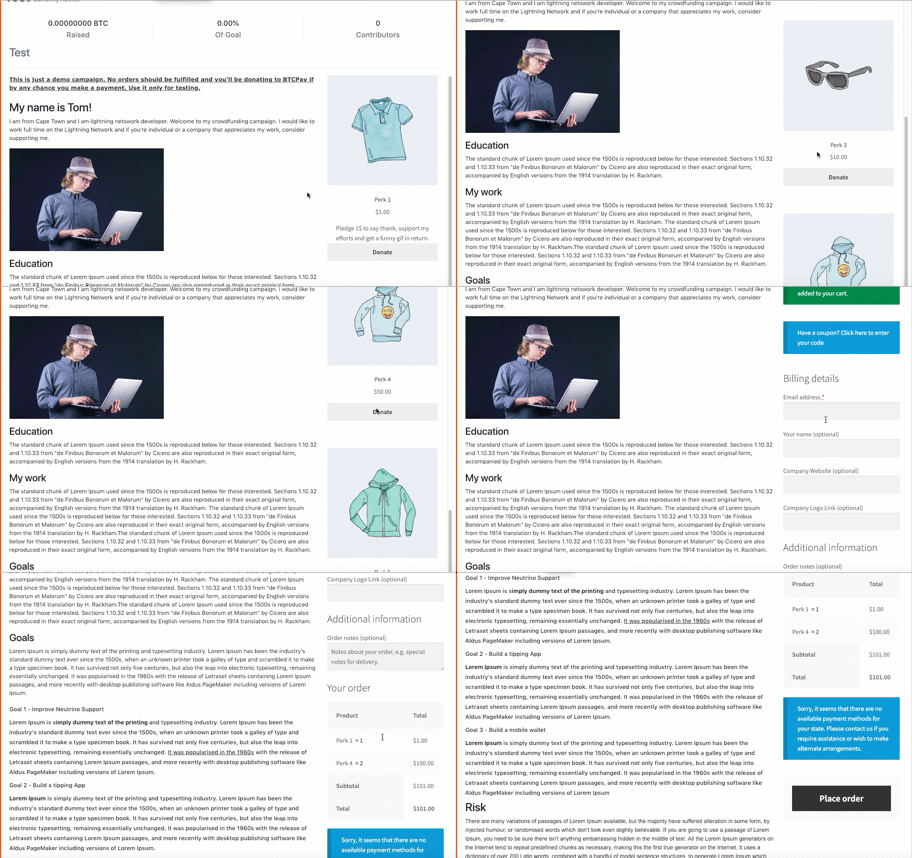
The following tutorial assumes you have a semi-advanced understanding of BTCPay, WordPress and WooCommerce.
# Requirements
- Wordpress Website
- WooCommerce Plugin (opens new window)
- BTCPay for WooCommerce Plugin (opens new window)
- Storefront Theme (opens new window) (if you're using another theme, you may need to modify the CSS code to fit your theme.
- BTCPay Server
Important Note Make sure that both your WooCommerce store and BTCPay Server are on a same domain. Some browsers have aggressive way of blocking the cross-domain embedded content. Quite specifically, Safari on iOS will destroy the cookie when the item is added, which will lead to empty cart. There's no other way to fix this besides having BTCPay and Woo on a same domain as subdomains at least.
# Optional WordPress Plugins
The following plugins are recommended, but not required. You don't have to use them if you're an advanced WordPress user.
- Flexible Checkout Fields (opens new window) (to edit checkout and remove redundant checkout fields in Woo)
- WooCommerce Direct Checkout (opens new window) (remove redundant steps in the checkout process and make pledging quicker)
- Header and Footer Scripts (opens new window) (place
<script>code here)
# Instructions
# 1. Connecting two stores to a single wallet
In your BTCPay Server, create two separate stores:
- Store for WooCommerce
- Store for Crowdfunding app
Add the same extended public key derivation scheme, so that both stores remain in sync.
# 2. Modifying CSS in WordPress
In the first step, you need to remove all the redundancies from the WordPress store and make it clean and simple, so that it embeds smoothly into the crowdfund app.
Place the following custom CSS code into WordPress. Appearance > Customize > Custom CSS
Click to view CSS
CSS file:
#header,
#masthead,
.site-footer,
.storefront-breadcrumb,
.storefront-sorting,
.storefront-product-section .section-title,
.woocommerce-products-header,
.woocommerce-additional-fields,
.woocommerce-form-coupon-toggle,
.woocommerce-breadcrumb,
.related.products {
  display: none;
}

.iframe {
  overflow: hidden;
}

ul.products li.product .button {
  margin-bottom: 0.236em;
  display: block;
}

.product:hover {
  background-color: rgba(0, 0, 255, 0.3);
  color: rgba(0, 0, 0, 0);
  padding-bottom: 45px;
}

.product:hover a * {
  visibility: hidden;
}

.product:hover a.add_to_cart_button {
  position: absolute;
  top: 0;
  left: 0px;
  width: 100%;
  height: 100%;
  padding-top: 50%;
  color: white;
  background-color: rgba(0, 0, 255, 0.3);
}

.product:hover a.add_to_cart_button:hover {
  background-color: rgba(0, 0, 255, 0.5);
}
The code above removes and hides all the unnecessary things from your store (headers, footers, breadcrumbs, and sorting). If you're not using the Storefront theme, you may need to modify it slightly. Besides removing, the bottom part of the code adds a bit of different styling which improves the checkout experience and makes it more KickStarter like. Feel free to modify colors. You should also remove the sidebar.
To remove the redundant fields in WooCommerce checkout, use Flexible Checkout Fields (opens new window).
To speed up the checkout process use WooCommerce Direct Checkout (opens new window) (remove redundant steps in the checkout process and make pledging quicker)
# 2. Modifying WordPress functions
Insert the following code at the bottom of your child theme's functions.php file.
// Code goes in theme functions.php
add_action( 'after_setup_theme', 'wc_remove_frame_options_header', 11 );

// Allow rendering of checkout and account pages in iframes
function wc_remove_frame_options_header() {
    remove_action( 'template_redirect', 'wc_send_frame_options_header' );
}
If you add the php code directly into Appearance>Editor>functions.php, next time you update the theme, the changes will be wiped. So, use either use a custom function plugin of some sort, or create a child theme (opens new window) and always place the code at the bottom.
# 3. Adding script to WordPress
Install Header and Footer Scripts (opens new window) plugin. Add the following code to your header or footer. Settings > Headers and Footers Script, paste the code and save changes.
<script>
  jQuery(document).ready(function () {
    jQuery('.product').each(function () {
      var product = jQuery(this)
      var item = product.find('.woocommerce-loop-product__link')
      var cartLink = product.find('.add_to_cart_button').attr('href')
      item.attr('href', cartLink)
    })
  })
</script>
This piece of code makes sure that each click on the product area adds it to cart and prevents users from viewing product description, which is completely unnecessary for our use-case.
# 4. Modifying the Crowdfunding app
In your BTCPay, Apps > Create New App > Crowdfunding.
In the description of your app, toggle the code and paste the following code and add <iframe src="http://yourdomain/shop/"></iframe>
Replace it with the URL of your WooCommerce Store page.

Next, paste the following code into the Custom CSS Code section of your crowdfunding app:
Click to view CSS
CSS file:
#crowdfund-body-header-tagline-container,
#crowdfund-body-description-container {
  max-width: 100% !important;
  width: 100% !important;
  flex: 100%;
}

#crowdfund-body-contribution-container {
  display: none;
}

#crowdfund-body-header-cta {
  display: none;
}

#crowdfund-body-description-container iframe {
  width: 100%;
  border: 0;
  min-height: 500px;
}
/* // Medium devices (tablets, 768px and up) */
@media (min-width: 768px) {
  #crowdfund-body-description-container {
    padding-right: 30%;
    min-height: 1200px;
  }
  #crowdfund-body-description-container iframe {
    width: 30%;
    position: absolute;
    right: 0;
    top: 0;
    height: 100%;
    border-left: 1px #e5e5e5 solid;
  }
}
One final thing, make sure to check (enable) Count all invoices created on the store as part of the crowdfunding goal Save the changes and preview the app.
