# How to penny-pinch your Azure deployment
This guide is for Azure-deployed (opens new window) users who wishes to do some saving on their install.
Please do this only after your nodes are fully synched. During synchronization you need a powerful setup.
Penny-pinching is an opportunity for you to better understand the resources you are consuming and tailor the configuration to your workload.
Downside:
- Running
btcpay-update.shor rebooting will take longer - You might see
502 Bad Gatewayand your node taking lots of time to start - Your server might become very slow
Upside:
- 50% savings
If you find that your server is too slow:
- Drop support for coins by editing the setting
BTCPAY_DOCKER_COMPOSEin/etc/profile.d/btcpay-env.sh, or - Increase the size of your Virtual Machine
WARNING
After some testing, it seems that following this guide for a setup on mainnet involving BTC+LTC+CLightning is a bit too much and makes the server very laggy.
Note that the server becomes less laggy as time passes after restart, so it might still be ok for your case.
If it is not acceptable, you should switch from B1MS (20 USD/Month) type to a B2S (40 USD/Month) type.
# How much am I spending now?
Find out how much your installation costs:
- Go on the Azure portal
- Go to Subscription (If you don't find the
Subscriptionmenu searchSubscriptionin the search bar next to the notifications bell.) - Go to Cost Analysis
- Select your Resource group (mine is called "dwoiqdwqb')
- Timespan 30 days
- Click on apply
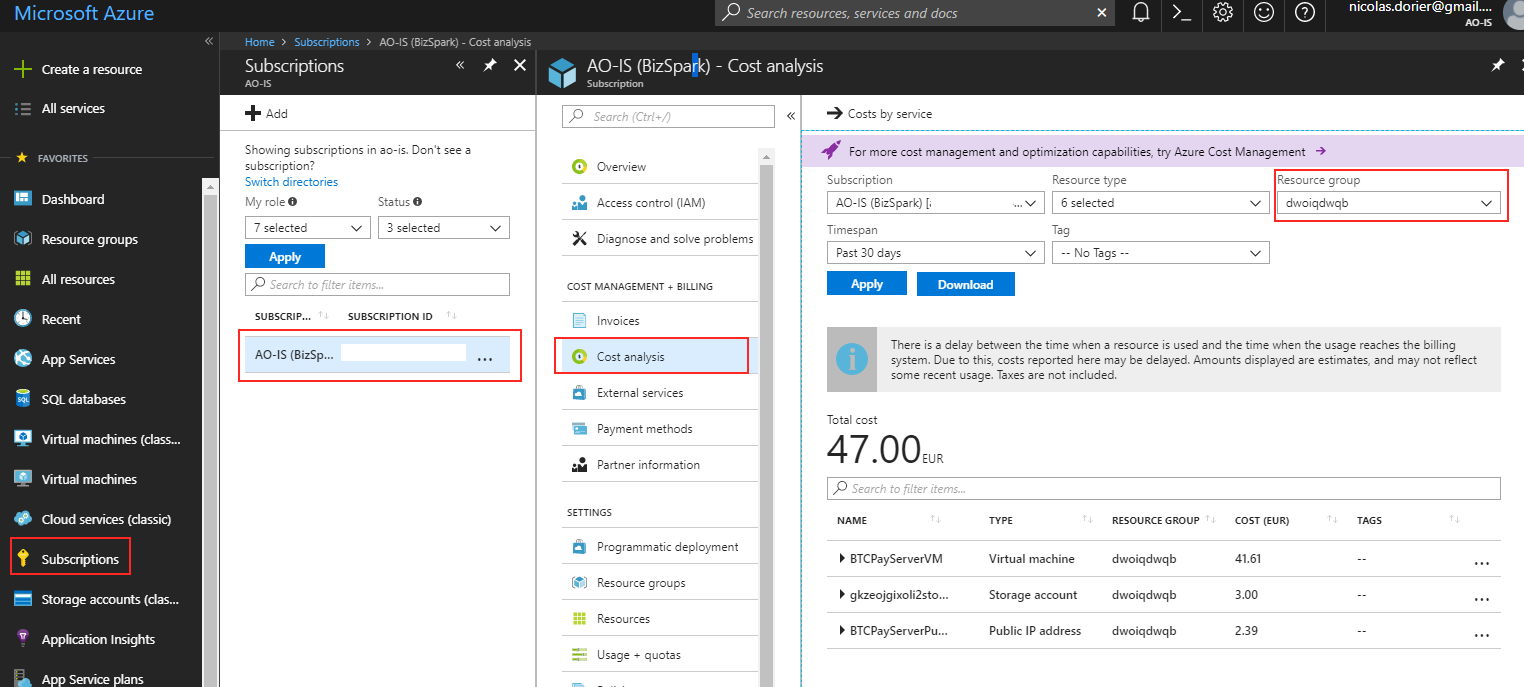
As you can see, my install costs 47.00 EUR/Month.
Most of the cost is spent on the virtual machine.
# What is my current configuration
First see what Virtual machine you currently have:
- Go on the Azure portal
- Go to Resource Groups
- Select your resource group
- Select BTCPayServerVM
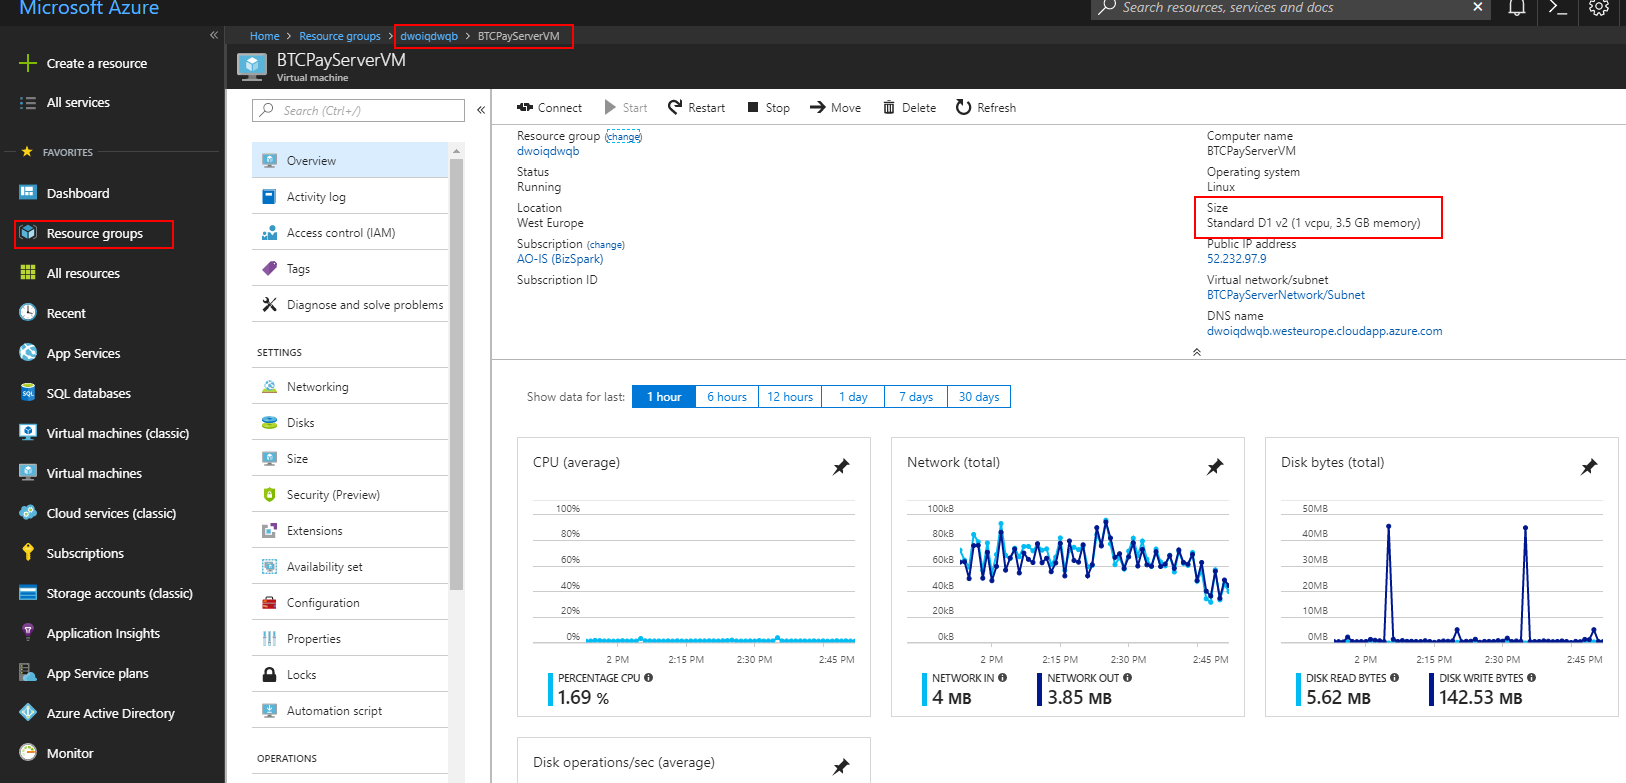
As you can see the CPU is mainly unused, disk as well. We can probably cut some fat here.
Also my VM type is Standard_D1_v2. As you can see on Azure Price Website (opens new window).
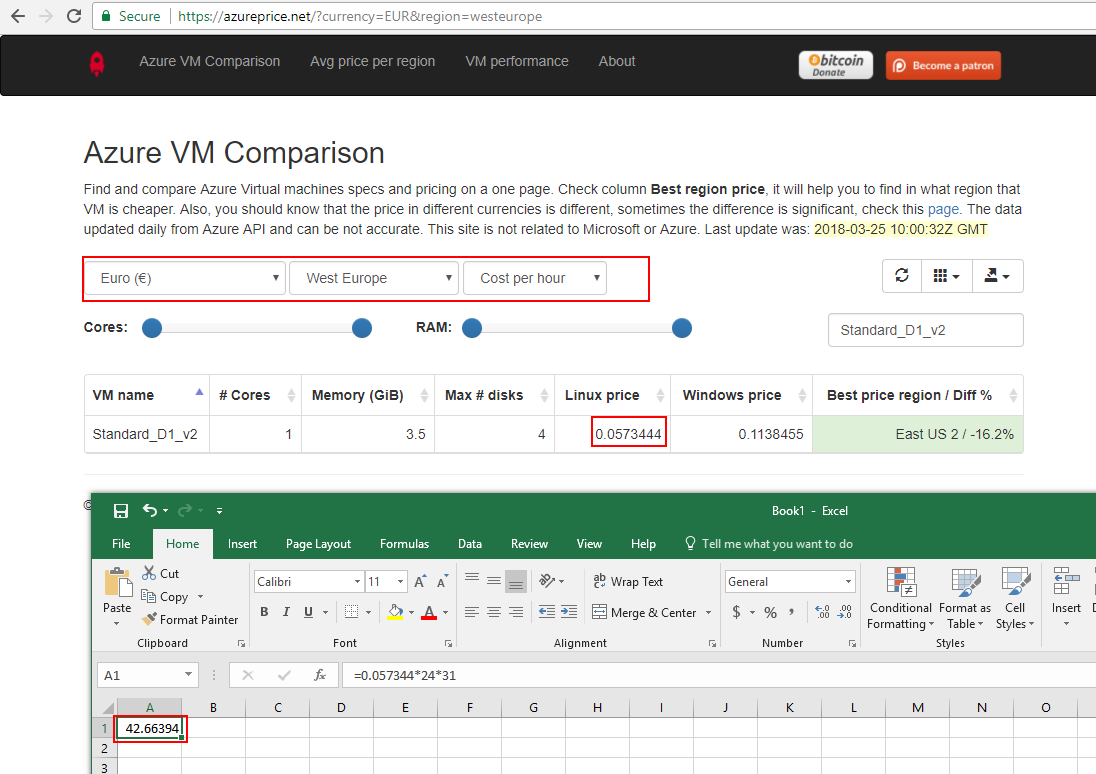
This costs me 0.0573444 EUR/H or 42.66 EUR/Month.
Now we know that downgrading this VM will bring us the largest cost benefit. Let's see how far we can go.
Connect by SSH to your VM, then:
sudo su -
docker stats
As you can see, I have 3.352 GB of RAM, and around 55%.
The free command also seems to tell me I have approximately 1GB of RAM in fat:
root@BTCPayServerVM:~# free --human

             total       used       free     shared    buffers     cached
Mem:          3.4G       3.2G       138M        30M       8.8M       991M
-/+ buffers/cache:       2.2G       1.1G
Swap:           0B         0B         0B
# Selecting a new Virtual Machine
Now we know that 2 GB of RAM, and a less powerful CPU will probably do the trick.
But first, you don't want your machine to crash if it runs out of RAM, so you need to add some swap:
Note that /mnt is used in Azure for temporary data, and is optimized for low latency, this is why we set the swapfile here.
sudo su -
fallocate -l 2G /mnt/swapfile
chmod 600 /mnt/swapfile
mkswap /mnt/swapfile
swapon /mnt/swapfile
echo "/mnt/swapfile   none    swap    sw    0   0" >> /etc/fstab
As you can see, the swap got added:
root@BTCPayServerVM:~# free -h
             total       used       free     shared    buffers     cached
Mem:          3.4G       3.2G       141M        30M       9.8M       983M
-/+ buffers/cache:       2.2G       1.1G
Swap:         **2.0G**         0B       2.0G
Now, go back to azureprice.net (opens new window) and find something cheaper than 0.0573444 EUR/H.
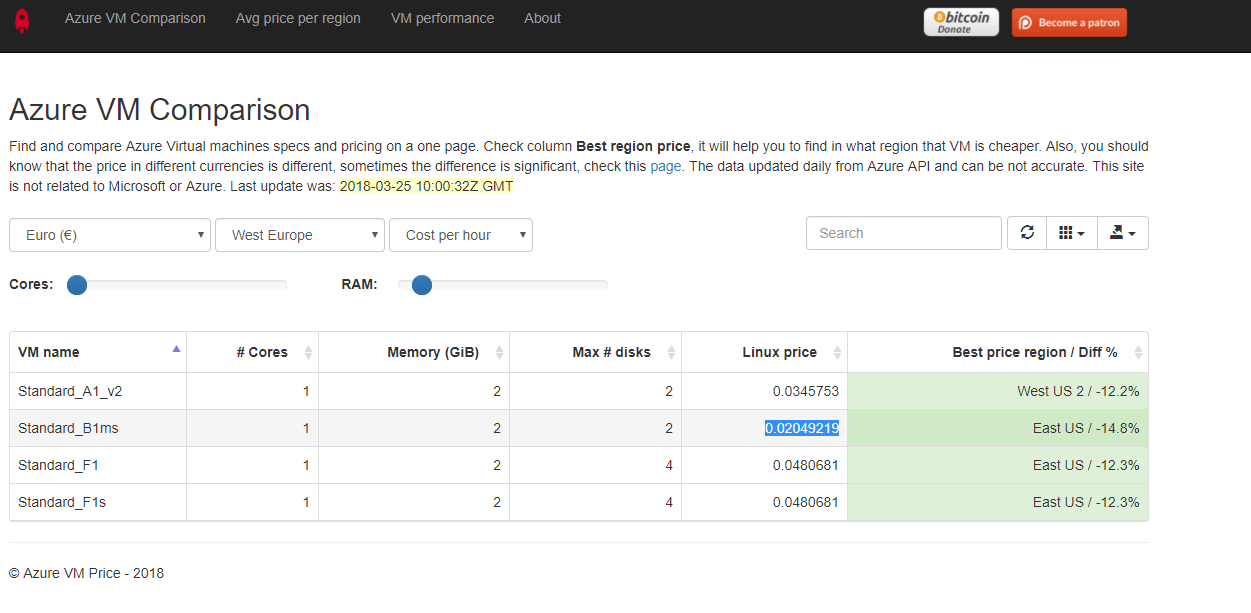
Wow! Standard_B1ms cost only 0.02049219 EUR/H – let's switch to it!
A quick look at this article (opens new window) shows us that this type of virtual machine is adapted for low CPU consumption with occasional burst. This is what BTCPay Server is about after the nodes are synched.
- Go on the Azure portal
- Go to Resource Groups
- Select your resource group
- Select BTCPayServerVM
- Select
Size - Select
B1MS(if you don't see, take a look at the FAQ) - Click
Select
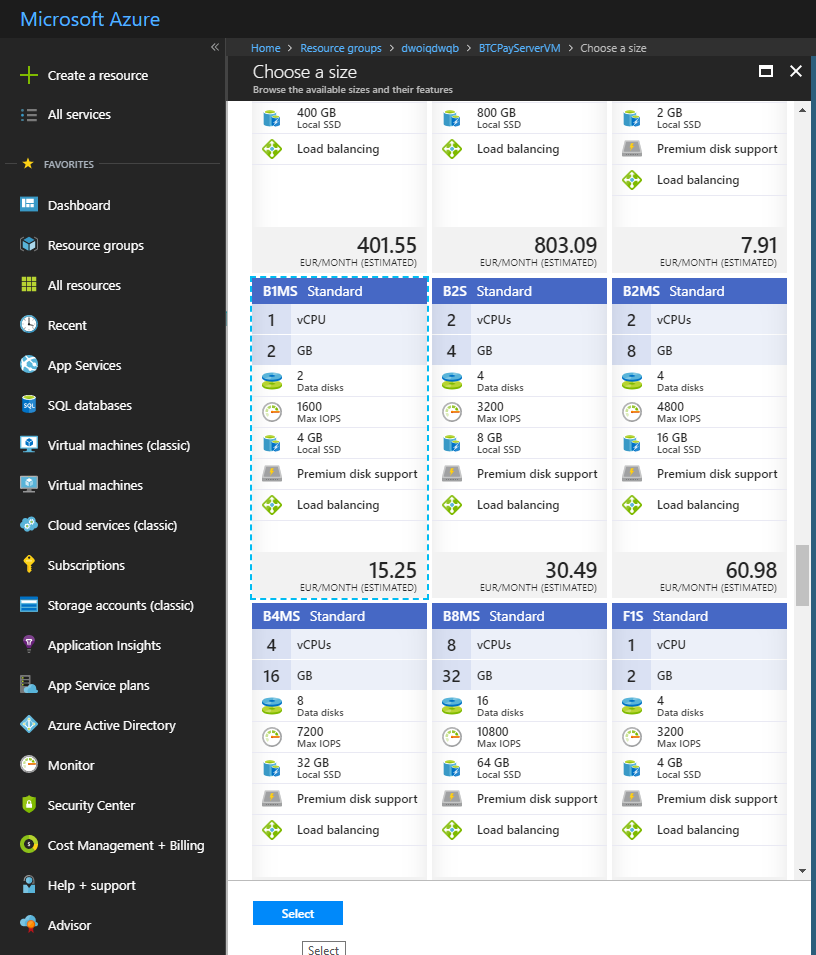
Wait between 5 and 15 minutes.
When Azure is happy:
Congratulations! You just cut down the cost by 50% per month! 😃
# FAQ: B1MS does not appear in the list
In some situation, you might not see the Virtual Machine B1MS in the list. It means your Azure hardware cluster does not support this type.
WARNING
Stopping your Virtual Machine will change the public IP Address of your server. If you configured a A (as opposed to CNAME) record in your domain registar, you'll need to update it.
You need to go in:
- Your Virtual Machine resource
Overviewmenu- Click on
Stop
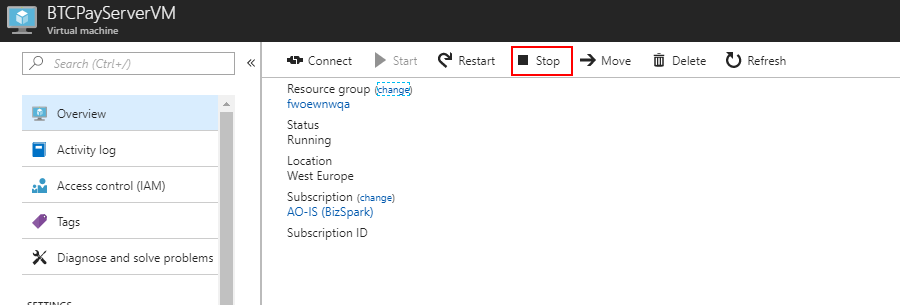
Wait until the Virtual Machine has stopped, then change the size.
Once the size is changed, go back to Overview and click on Start.
← Clovyr Google Cloud →
