# Electrum Personal Server (EPS) integration
Electrum Personal Server or EPS (opens new window) is a personal version of public Electrum servers like ElectrumX.
EPS can be integrated into BTCPay Server using the optional docker fragment opt-add-electrum-ps.yml (opens new window). Use EPS when you want to use your own full node (included in BTCPay Server) to verify your own transactions privately when using Electrum Wallet.
The biggest difference with public Electrum servers (eg. ElectrumX), is that EPS is for monitoring only your own wallet(s). The "XPUB" (extended public key) of the wallet you use in Electrum must be shared with EPS in order for it to function all all. Other than this, it functions (from an end user perspective) in the same way as ElectrumX etc. It is easy to integrate into BTCPay just follow the instructions below.
EPS does not require txindex and works on a pruned node.
# About Tor support
By default your EPS is accessible over Tor. You can run the following command line via SSH on your server to get your Tor address:
cat /var/lib/docker/volumes/generated_tor_servicesdir/_data/btc-electrum-ps/hostname
You can also go to your BTCPay Server > Server Settings > Services and find the tor link in Other TOR hidden services.
On the Electrum wallet machine, if you want to connect to your server via Tor, we assume in this tutorial that you run the Tor Browser locally, and thus you will use SOCKS5 port 9150. If you run Tor through the command line instead, the local SOCKS5 port is 9050.
# How to enable Electrum Personal Server (EPS) in BTCPay:
If you do not use Tor, EPS is accessible for Electrum Wallets via TCP port 50002. You need to open this port up fully at least to be available within your own network to any PC or Android device running Electrum Wallet, and turn on port forwarding. If you use Tor, you can skip this step.
As EPS is for a single wallet (single user), you must specify the XPUB/YPUB/ZPUB of your wallet as an environment varable before you enable the EPS docker-fragment. In Electrum Wallet go to the "Wallet" menu then select "Information" to copy and paste yours. Set ENV variable for your wallet XPUB and enable the Docker Additional Fragment on your BTCPay node by running the following steps:
export BTCPAYGEN_ADDITIONAL_FRAGMENTS="$BTCPAYGEN_ADDITIONAL_FRAGMENTS;opt-add-electrum-ps"
export EPS_XPUB="XPUB_ADD_YOUR_XPUB_YPUB_OR_ZPUB_HERE"
. btcpay-setup.sh -i
- WAIT for your Bitcoin full node and EPS server to fully sync:
You can check the status of bitcoin core sync by going to your domain for BTCPay server, and it will show you on the front page. Or, you can check from the command line as well, using these commands:
docker logs btcpayserver_bitcoind- this will show you the bitcoin core blockchain sync status (and ALL other info about your node, including any errors)docker logs generated_electrum_ps_1- this will show you the EPS sync status. Note: EPS will NOT start syncing until bitcoin full node has finished syncing, you will see errors until that is finished and these can be ignored.
Once all syncing for both bitcoin and EPS have finished synching, you can proceed to the next step. (Note: Electrum wallets will not connect to an EPS server that has not finished synching)
# How to connect Electrum Wallet to EPS
There are three ways to use your server from Electrum Wallet:
- By editing the configuration file
- By running Electrum by the command line
- Via the user interface (not recommended, bad privacy)
# Option 1: Connect to your EPS Server by directly editing Electrum Wallet config file (before even opening the Electrum wallet GUI - recommended for full privacy):
You can setup your Electrum server by editing the configuration file.
In the Electrum Wallet folder (opens new window), open and edit the config file like this:
Find line:
"auto_connect": true,and switch it to:"auto_connect": false,- this will prevent your Electrum Wallet from auto-connecting to other 3rd party Electrum Servers at launch time (to obtain block headers and transaction information).Find line:
"oneserver": false,and switch it to:"oneserver": true,- ensures that all data is obtained from just one server.Find or add line:
"server": "yourserver:50002:s",and switch it to your own EPS Server's IP address, in the example above this would be:"server": "192.168.1.3:50002:s",- hard code your IP address as the default upon opening the Wallet.
These 3 steps strongly recommended for full privacy by locking down Electrum Wallet to one single connection with your private server only (Reference (opens new window)).
- (If you use Tor) If you run Tor Browser, you can use it as SOCK5 proxy by adding
"proxy": "socks5:127.0.0.1:9150::",to the configuration file.
# Option 3: Connect to your EPS Server by command line
You can run electrum via command line electrum --oneserver --server yourserver:50002:s.
If you use Tor, add -p socks5:localhost:9150.
# Option 4: Connect to your EPS Server from Electrum Wallet GUI (not recommended as this will momentarily connects with other random public Electrum servers if you are online):
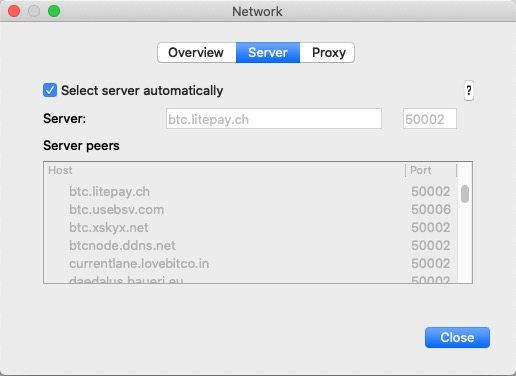
- Open Electrum Wallet. When you click the traffic light (green or red) at the bottom of your Electrum Wallet, you will see a screen with a list of all the available Electrum servers that your wallet can connect to, normally with the
Select Server Automaticallybox already checked:

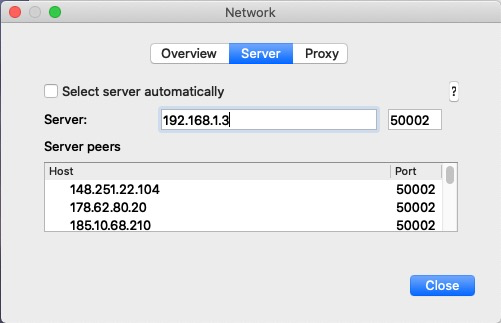
- Now is the time to UNCHECK that
Select Server Automaticallysetting, which will enable you to enter the IP address or domain or hostname of your EPS Server. In the case below, the EPS server is on the local network at192.168.1.3so we enter that manually (leave port as 50002) and pressclose.

(If you use Tor) Go to proxy, then click on
Use Tor Proxy at port 9150.If all of the above worked well, and your node is healthy and synched, you will get a green traffic light down the bottom right of the wallet screen - that means success!
# Reflection on what has been achieved:
You are now running your very own private EPS Server. All Electrum Wallet related data transfer happens directly between your EPS Server and the bitcoin blockchain, without going over any other 3rd party servers. You have attained full bitcoin transaction privacy (at least from the perspective of your blockchain queries and transactions, payment/receive addresses etc - nobody except you and the blockchain can see what you are doing).
# Troubleshooting:
So there is one thing you may encounter, where even after you did everything correctly, you still get a red traffic light (which means not connected to any server) in the steps above. Any other troubleshooting tips that people encounter can be added, I would suggest to make a PR to this document directly.
- If you get a red traffic light, shutdown Electrum Wallet completely, then go to your Electrum Wallet folder (see here (opens new window) if you don't know where that is).
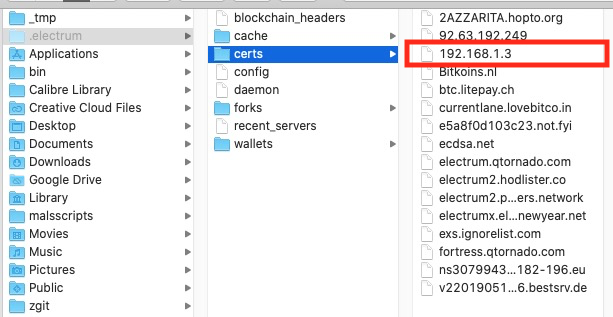
Inside the Electrum Wallet folder (in this case below, it is what it looks like on a Mac) locate the certs directory and delete the certificate for the server you are trying to connect to, in this case 192.168.1.3, by dragging it to the Trash.

Start up Electrum Wallet again, and connect to your EPS server. If it is fully synched, it will now likely show a green traffic light, and you are good to go.
